
Our 3 Favourite Editing Techniques in Adobe Lightroom
Whether you’re new to Adobe Lightroom, have intermediate experience or an avid veteran, we wanted to share our 3 favourite editing tools in Adobe Lightroom, and show how we use these in our day to day work.
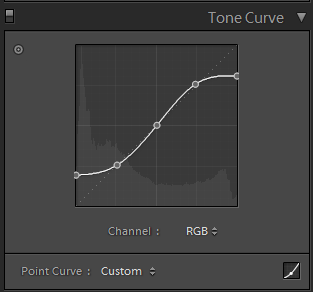
- Tone Curve
Tone curve is used to adjust the balance of the photo. Click the bottom right ‘edit’ tone curve button and click your pointer in the dead middle of the grid, and then click the top right corner of the bottom left square. Now drag the bottom left of the line up the left wall of the grid to apply a fade effect to your photo. This can make people’s skin appear softer in photos and take out any harsh lights you may have captured.
- Noise Reduction
If you are using high ISO settings on your camera, you may tend to get some noise in your images depending on your camera and lens. Noise appears to be little grainy dots all over your photos. The noise reduction tool is a great way of reducing this. Just increase the slider and you will see noise disappear. Beware, using too much noise reduction may blur and reduce the quality of your photo. If this occurs, try using the sharpening tool to increase the sharpness of your image. These two tools work hand in hand and can be found just above/below each other in Adobe Lightroom. In our experience, these are great for party photography where your subjects may be moving and you catch a slight blur. Sharpen the photo up in a big way and then use the noise reduction tool to reduce a little bit of the noise the sharpening creates. The noise reduction will also make a person’s skin appear soft and smooth which makes those people at events in which hate photos end up loving your photos of them!
- Split Toning
This is a great tool for event photos in a white room where people appear pale and whiter than usual, or if you’d like to spice things up a little and add a hint of a certain colour to the photo kind of like a filter. We’d like to share the way we use it most often. We find that people who attend a party enjoy looking a little more tanned than usual. Adjusting the highlights in the split toning section will apply directly to the subjects face/skin if you have had a flash pointing at them while taking the shot. Move the highlights hue to orange, and saturate appropriately. This will make them appear tanned. We then like to balance the image out a little by applying a hint of blue to the shadows’ hue and adjusting just a little. This will be enough to balance the orange effects of the above out, and potentially even add a little bit of flavour to the photo.

0 Comments